
Knowing how to assemble a layer cake is a very important thing to know for any baker, whether you are a Michelin star chef or a home baker. Making and decorating layer cakes is one of my favorite things to do! You can be really creative with the decorations, and it is really fun to assemble as well.
Making layer cakes can be as hard as you make it. You could use two ten-inch layers, or ten four-inch layers, it is up to you. The smaller and taller you go, the harder it will become. Good luck!
Tips
- Pick a really smooth and easily spreadable frosting. I would highly recommend one of my frostings, which were crafted with this important trick in mind.
- The shorter your cake, the easier it will be. If you are a beginner in layer cake making, then I would recommend only making a two-layer cake. It is much easier to handle and is a great first step.
- Make sure your layers are really leveled and flat. If the top of your cake is not flat, I would highly recommend leveling that too, otherwise your cake could fall apart.
Storing Your Cake
Storing a layer cake can be really simple. You can store it in the fridge if you want, this will make it last a day or two longer and lower the risk of any sort of accidents. Cover the cake with plastic wrap and it should be amazing for a few days, usually four. If you are like me and you plan on making cakes more then once a year, then I would highly recommend buying a cake keeper (you can get the one I have on Amazon!). They are great for transporting cakes as well. If you want a more decorative one, there are also some great options. You can shop on Amazon, thrift stores, or lots of other places as well. For my birthday last year, I got a great one from Anthropologie.
Full Instructions Video:
Recipes
These are the recipes that I used in the video above. They are great for layered cakes!
Special Tools
Here are the special tools that I use to layer cakes. None of them are necessary, but they make it a lot easier!
- Cake Leveler (buy on Amazon)
- Off-set spatula (buy on Amazon)
- Turntable (buy on Amazon)
- Cake Rounds (buy on Amazon)
Step 1:
Leveling your cakes is when you use either a cake leveler or a sharp knife to cut the top of your cake to make a flat top. It’s also when you cut a cake into multiple layers (if this applies to you). It is super important to take this step because it keeps your cake from sliding around and falling apart. If you use my vanilla cake recipe, it is much easier to level because it already has a flat top. Make sure your cake is completely cool before you start cutting!
Leveling a cake with a cake leveler is much easier than using a knife. To level a cake with a cake leveler, first make sure both sides of the wire are at the same level. This should be right below the line where your cake starts to have a round top, or right below the flat top of your cake. Slide a knife along the top of the wire into the cake. Then slide the wire into the cut you have just made. Carefully start to move the wire side to side in a sawing motion. When you reach the end, keep the sawing motion until you have completely cut through the whole cake.
Leveling with a knife is much harder, but it still works. Use a standard serrated bread knife. Slide the knife in right below the dome of your cake or the flat top. Make sure the knife is level with your countertop! This is why I usually recommend using a cake leveler. Trying to keep your knife perfectly parallel to the counter is much harder than it sounds. Slowly start to cut around the cake in a circular motion, keeping the tip of your knife directly in the center of the cake.
The best part of this step is eating all the scraps later!
Step 2: Simple Syrup
While using a simple syrup is optional, I would highly recommend it, especially if you are making a cake a day or two in advance. Using a simple syrup always makes sure that your cakes are super moist.
Making a simple syrup is really easy. All you have to do is combine equal parts water and white sugar in a small saucepan over low heat and stir until the sugar is completely dissolved. Once your simple syrup is done, take a pastry brush and brush the syrup all over your cake layers, until you can see that every spot is not dry and covered with syrup.
You can also flavor your simple syrup if you would like. You can add any sort of extract you want and really get creative with it!
Step 3: Assembling Your Layers
Now comes the fun part, building your cake! This step really is as hard as you make it. If you have lots of smaller layers, then it will be much harder than having a few big layers. If you are just getting started in making layered cakes, then I would recommend having two or three larger cakes.
Ignore this next paragraph if you are not using a turntable or cake round. To start assembling your cake, take a little bit of frosting and wipe it on the center of your turntable. Then place your cake round directly in the middle of the turntable. Wipe another little bit of frosting in the center of the round.
If you are using a cake plate, wipe a little bit of frosting in the center of the plate. If you have a cake round, place the round centered in the middle of the plate and wipe another bit of frosting in the middle of that.
Pick the best-looking layer to be the base. This should be the layer that does not have any cracks and came very cleanly out of the pan. Place your chosen cake on top of the wiped buttercream and centered on your base.
Using a spatula, plop some frosting in the middle of your cakes. You should make sure that you will have enough to go between each layer. Spread the frosting all over the top of your layer. The frosting should be perfectly flat and hanging over the sides a little when you are done. Place your second layer on top and continue this process, making sure there is an equal amount of frosting on each layer. Make sure that the layer with the worst structure is second from the top, or if you are making a two-layered cake, it should be on top.
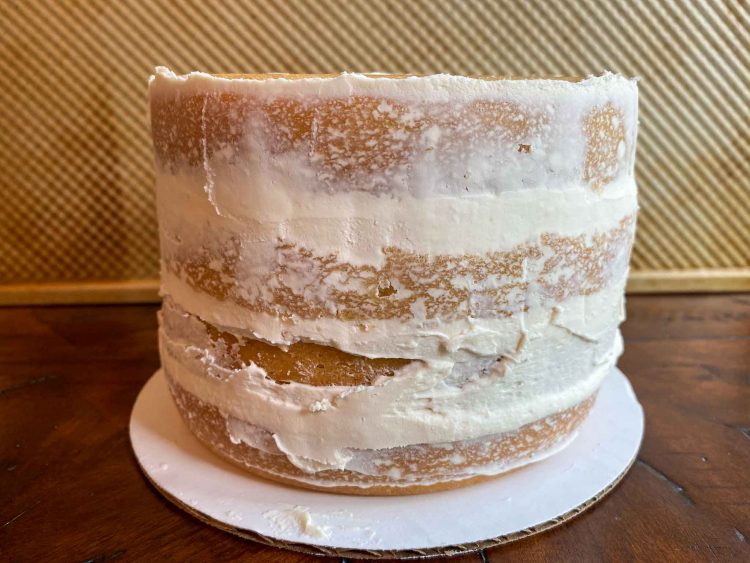
Step 4: Crumb Coat
The crumb coat is where your cake starts to look like an actual cake. This step is really important, especially if you are planning on having a beautifully decorated cake. A crumb coat is an outer layer of frosting that locks in all your cake’s crumbs and gets it ready to decorate.
To make a crumb coat, take your off-set spatula or butterknife and first smooth the extra frosting on your cake. This should mean that all the frosting that was hanging over the sides of the layers is now smooth and giving your cake perfectly straight sides. Next, plop frosting on the top of the cake. Smooth it out, just like you did with the frosting in between the layers, but it does not have to be as thick. It is fine if you can see spots of cake through the frosting, it just has to cover everything! If there is any frosting hanging over the sides, smooth it down the sides. Lastly, wipe a little more frosting on the side of the cake and smooth it out with your knife. Again, it is ok if you can see a little bit of the cake through the frosting. Make sure the edges are sharp and place the cake in either your freezer or fridge for about ten minutes. When the frosting feels hard to the touch, you are ready to decorate!
Step 5: Decorating
You can do this however you like. Not sure what to do? Check out my Instagram for some ideas!